One of the blogs I follow is written by a very talented lady called Amanda Weatherill who is otherwise known as 'The Patchsmith'. Amanda designs and writes patterns. She has written quite a collection of patterns for mug rugs. I am lucky enough to own several of her delightful mug rug patterns one of which is called 'Ticker Tape Mug Rug'.
Earlier this week, Amanda posted on her blog about making herself a new Ticker Tape mug rug and, flushed with the success of making my last two mug rugs, I felt inspired to find the pattern and have a go at making some.
This pattern is so quick and easy to put together, that I had time to make two! One in greens/reds and one in blues/browns.
They were great fun to make and are a fabulous addition to the Christmas decorations!!
I used up some of my scraps to make them, just fussy-cutting some of the rectangles to add an extra Christmassy feel with the snowmen. The cut shapes are fused to the background and I finished them off with a machine blanket stitch.
Just perfect for those mugs of hot chocolate or coffee and mince pies!!
I hope your Christmas preparations are going well. As I will now be busy with friends and family until into the New Year, I would like to thank you for visiting my very humble blog and, wish you all a very, very Happy Christmas and health and happiness for 2015!! Looking forward to seeing you all again then!
I had such a fabulous time participating in the last sew-a-long, that I have already told Martina I would love to participate in this one. The idea is to sew and then share (via a link on Martina's blog) projects made from Gail Pan Patterns.
I have quite a number of unmade Gail Pan patterns in my possession, including two new ones I bought recently together with some of Gail's fabulous first fabric collection 'Baskets in Bloom'. I can't wait to get started!!
I have always admired crazy quilts. I love the combination of the piecing with the addition of various beautiful embellishments and I have often thought about trying to make one. I think the CQJP Challenge 2015 may well be the little push that I needed to get started.
Once I had made the decision to go ahead and join the Challenge for 2015, I was keen to get stitching! The rules state that you are allowed to start construction of the blocks from September 2014. As I have never pieced a crazy quilt block, I thought perhaps I should try one. So this weekend I put together my first basic crazy quilt block. I used Tilda fabric scraps and a paper foundation technique. I am very proud of my first crazy quilt block and now I am eager to start embellishing it!!
Registrations for the CQJP Challenge 2015 close on 20th December 2014. If you would like to join in as well, why not pop across to see for yourself what is involved.... it sounds like it is going to be fun! I am really looking forward to it! Especially, to learning new techniques as the year progresses and to meeting some new stitching friends!
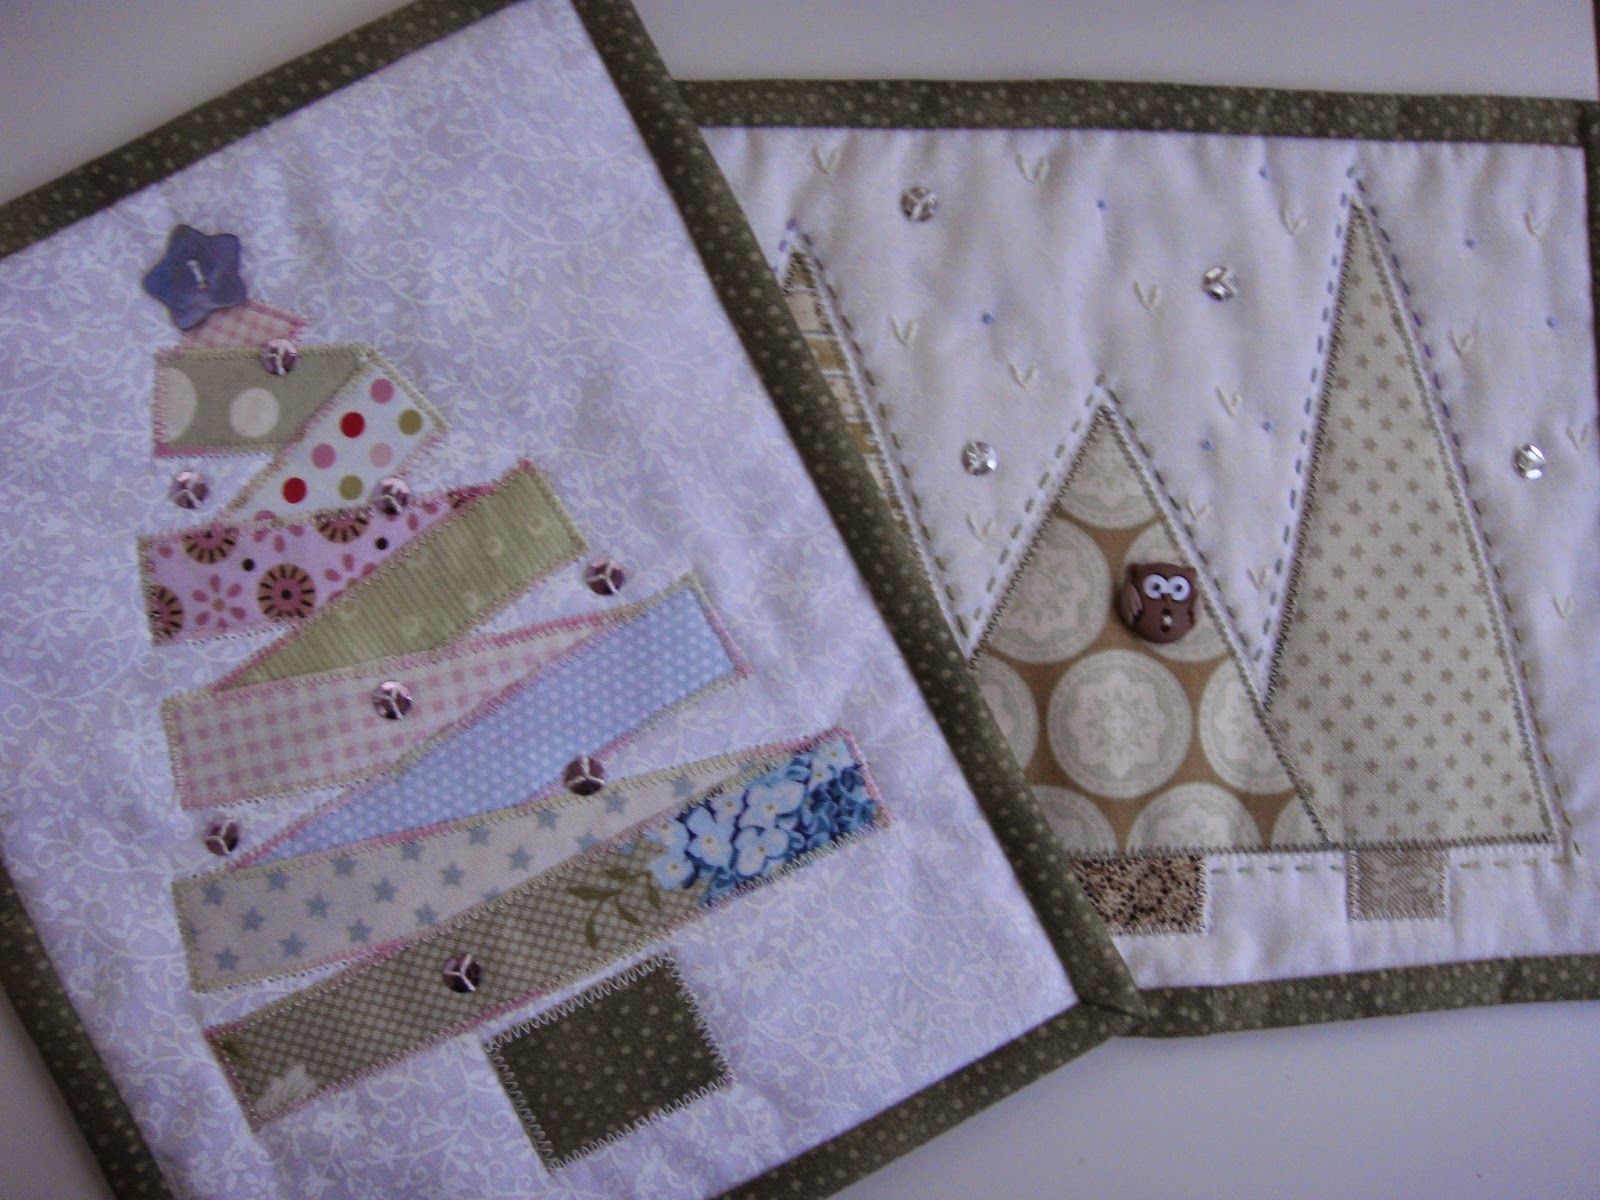
For several weeks now I have had one of my little ideas nagging at the back of my mind. I so enjoyed making the mug rugs for the swap I participated in and, I have seen so many cute Christmas mug rugs around on the internet that I really wanted to make some. However, with Christmas just around the corner, it has been very busy here and I just haven't had the chance!! Until this week!!
I wanted the mug rugs that I had in mind to feature trees.
Firstly, because I have seen lots of tree designs that I like but also because I wanted an excuse to use one of the cute little owl buttons that I recently bought.
I had a great time designing and planning how I wanted the mug rugs to look and then using up some scraps of fabric to make these fun little projects.
I also enjoyed embellishing them both with sequins and a small amount of hand stitching.
Hello! I hope you all had a great weekend. It was a bit wet at times here but that always means extra time in the sewing room, so the wet weather is not a problem for me!
This weekend I discovered the most wonderful tutorial for a cute little drawstring bag which would make a fabulous gift bag if you are looking for something to put that last minute Christmas gift in or to add that 'handmade' touch to a gift. It is a really great design and the instructions are quick and easy to follow.
In addition to being able to put a gift inside the bag, the wrap-over of the fabric both at the front and back creates useful pockets for any little 'extras' you might want to add. Then, when tied closed, the flap of fabric at the top creates a pretty bow shape to decorate the bag.
I found the tutorial through Pinterest but the blog where it is featured is called 'One Lucky Day' and is written by Paula Cheney who shares some lovely crafty projects. In the original post where the tutorial appears, the bags were made as treat bags for Easter but, you can alter the size of the starting square and hence the finished size of the bag and make them for any gift.
I made just one this weekend as I was also working on another project but, I will be making more!! I used my favourite Tilda fabrics and started with a 14 inch square of fabric which resulted in a very cute little bag and I am very happy with it!
Now that it is December, I have had to face up to the fact that Christmas is coming!! I have finally started some Christmas shopping and, I thought it was also time to start some Christmas sewing projects too. I know it is a bit late but, better late than never!! I have seen so many beautiful Christmas projects in magazines and on Pinterest that I would like to stitch, making it difficult to know where to get started.
However, last weekend I was browsing through one of my Pinterest boards when I came across a beautiful Christmas decoration that I pinned some while ago. I followed the pin back to the blog that it had been pinned from and found a lovely tutorial for it. It didn't look too difficult and I had everything that I needed to make one, so I thought I would give it a try.
I printed out the instructions which I think are an excerpt from the book 'Fa La La La Felt', sorted out some felt, beads and threads and got started!
Here is my finished decoration. It went together very well and I am delighted with the result... I just need to make lots more now!!
If you hadn't already guessed, the fat crocheted ball that I showed you in my last post was indeed the start of a new owl friend. The pattern is from the Autumn 2013 issue of 'Love Crochet' magazine.
Over the weekend I got the opportunity to finish off all the details and this is how my cute little owl friend looks now.
When my sister came to stay with me recently, she asked me if I would make her a new bag for the pager (bleep) that she carries with her at work. It has become a bit of a tradition for me to make the bag that she uses ever since, some number of years ago, I gave her a handmade bag and, she found it was just the perfect size to carry with her for her pager.
The original bag was made following a pattern from the book 'Handmade Embroidered Bags' by Jenny Rolfe. It wore out quite some time ago and, I have since made another (using a very simple design of my own) but, I don't have a photograph of that one! Now the second one has worn out and a new one is needed. It needs to be reasonably small with a long strap that she can put across her torso, leaving both hands free for her to work.
As most of the bag patterns I have are for much larger bags, I decided to have a look on the internet for tutorials and I found a very nice one (via Pinterest) on the blog Susie's Country Garden. The tutorial was originally for a bag designed for travel documents but, I think it is going to make the perfect pager bag!!
It has a pocket on the front which I decorated with a little piece of appliqued sheep design ribbon.
It has a flap which you can close using the button and loop and it has a nice long strap.
It also has a pocket inside (I apologise for this photo but it is difficult to photograph the inside of a bag very well!)
All in all, I think it will be perfect and, I won't have very long to wait to find out if I am right as, the bag is already in the post to my sister and I am sure she will let me know!! I used some of my favourite Tilda fabrics to make it, so I hope she likes it!!
After much thought (thank you for your suggestions) and, inspired by a quilt block that I had seen on the Facebook page of Leanne's House... I decided to make the little stitchery that I had finished in my last post, into the central square of a similar patchwork block.
Once the block was pieced, I was very pleased with how it was all looking but, I needed to decide what to do with it next!!
In the end, I decided that I would make it into a picture that I could hang and enjoy somewhere in the house. Instead of framing the block as I have done in the past, I decided I was going to stretch it over a square canvas to make the picture.
I added a two inch blue border to the central block and then carefully stretched the fabric to the back of the canvas.
I pinned it in place to make sure that it was centrally positioned then, once I was happy, I turned in the raw edge of the blue fabric, making a hem and stapled it to the back of the canvas frame.
It was a bit fiddly getting the corners to look neat but, I think I just about managed it!!
I was delighted with the finished result and the picture is now happily hanging on my sewing room wall with several other pieces of embroidered artwork.
Hello! I am just popping in today to show you my progress on the little stitchery that I started recently. I have finished all the stitching and I am now wondering what I should use it to make.
In the recent post where I showed it, all I had embroidered was a circle of flowers and leaves.
I used lazy daisy stitch to make the petals of the flowers with a colonial knot in the centre of each. The stems were a simple running stitch and the leaves were also lazy daisy stitches.
Now, I have added a little appliqued butterfly to the centre which I finished with a tiny buttonhole stitch. I added the antennae using back stitch with a colonial knot at each of the ends. When I had finished that stage, I wasn't sure that the stitchery looked quite finished, so I added in another circle of leaves and buds.
These were stitched using fern stitch and colonial knots. At the bottom of this inner circle I added a little row of flowers which I created using detached fern stitches, colonial knots and a few lazy daisy leaves.
Then to balance the look of these flowers in the circle of stitching I added three little cross stitches at the top.
I am quite happy with all the embroidery but, I am not sure what to use it for.... should I use it to decorate the front of a drawstring bag? Or a needle book? Or use it in the centre of a block and frame it? Lots of possibilities. I think I may have to look through some of my many books to find inspiration. That's a nice prospect for the weekend!!


.JPG)
.JPG)
.JPG)
.JPG)
.JPG)
.JPG)


.JPG)
.JPG)
.JPG)


.JPG)


.JPG)
.JPG)
.JPG)
.JPG)
.JPG)
.JPG)


.JPG)
.JPG)


.JPG)
.JPG)


.JPG)
.JPG)


.JPG)

.JPG)
.JPG)